UI Test Framework Architecture: How Test Automation Works in VSTS 2010
We have been using VSTS CodedUI Tests for over 3 years now for functional regression testing and have been intrigued by this complex yet simple tool. Yes, you read it right. It's complex yet simple because only a highly complex architecture can support so much in a single tool. And yet, for the user, it's very simple and a breeze to work with.
The mechanics that underpin any test automation tool are quite intricate and yet interesting. The basics remain the same across tools; the differences lie only in the architectural details. Let's take a plunge into the architectural details of UITest Framework that the testing components of Visual Studio use and understand how an automation tool works.
Let's first take a look at the architecture of CUIT Framework:
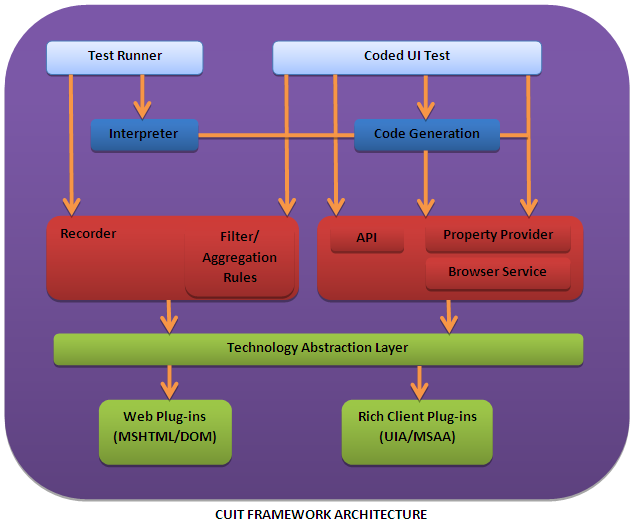
Let us go through the various blocks one by one and try to understand their significance starting with the plug-ins.
- Plug-ins / Technology Adapters: A plug-in or a technology adapter is a module that understands the corresponding User Interface technology and provides the UI technology specific services to rest of the modules. The role of a technology adapter is to understand the technology for which it is designed and provide services to the rest of the layers especially the abstraction layer. For example, to record/playback user actions on IE we have the Web Plug-ins (MSHTML/DOM) that understands the technology on which IE is based (i.e. MSHTML/DOM). It can thus communicate with IE and the automation tool thus providing a communication medium between the two thereby enabling the record and playback services.
- Abstraction Layer: Next up is the abstraction layer which helps abstract rest of the code from various technologies. The abstraction layer has a very important role to play when supporting multiple technologies. This layer sits between the plug-ins and rest of the modules. The record and playback engine speaks to the abstraction layer which makes the engine independent of the technology being automated. The abstraction layer translates everything coming from the plug-ins and feeds the test engine with the input that it can understand and also send instructions back to the plug-in for playback.
- Recorder and Playback Modules
Recorder: The recorder first records the raw steps (user actions) and based on the filter\aggregation rules, these raw steps are converted into filtered steps or user-intention.- Filter rules are the rules based on which the recorder can filter out any unwanted/unintended actions like back-spaces pressed while typing into and edit-box etc.
- Aggregation rules are used to club multiple user actions into a single step wherever applicable. Eg. Going to start menu, launching IE and typing URL in the address bar can be aggregated into a single step as it can be performed in a single step while playing back the recording. This is also called as Intent Based recording.
Playback: The playback module has a rich set of public APIs for the users that they can use to write robust tests. The APIs can be used to interact with the AUT in many ways like performing click action on a button or a hyperlink or selecting an item from a drop-down list. It also has property provider which gives information on properties supported by each control in the AUT and browser services for browser specific operations like navigate to URL, clear cache etc.
- The two clients that are available as of today sit on the top layer:
- Test Runner: The Test Runner uses the UITest framework to do Fast Forwarding for manual tests. The Test Runner interprets (using the interpreter module which actually forms a part of the Test Runner) the recording on the fly and calls appropriate API on the playback side to perform the user actions on the UI of AUT.
- Coded UI Test (CUIT): The Coded UI Test which effectively is a Visual Studio client generates code out of the recording performed by the Recorder module. It uses information provided to it by property provider for each control to create definitions for the controls (in the AUT) and add appropriate API calls to replicate the user actions performed during recording session. These properties are used to identify the controls in the AUT during playback session. The users can alternatively hand-code the entire CUIT using the rich set of public APIs.
In summary, how automation tools work in general can be understood from the discussion (above) of their components. What distinguishes one tool from another is their implementation/architectural details.
Happy automation!
Note: Information presented in this write-up is based on the references taken from MSDN blogs and libraries.
Topics: Workplace Tips
Recent Posts
Awards & Accolades

Arctern was recognized with the coveted "Red Herring Asia 100" award in 2010.
The award recognizes Arctern as amongst the 100 most promising companies in the Asia-Pacific (APAC) region that have distinguished themselves by their innovations and technology adaption in their respective industries.

Arctern was selected by NASSCOM, India's premier trade body for the software and services industry, as one of the Top 50 Emerging IT Companies in India for the year 2009.
NASSCOM's Emerge 50 is an initiative to identify and honor emerging companies that are redefining the benchmark of excellence.


Get in Touch with Us
20th Floor, New York,
NY 10018